Showing posts with label The Kitchen counter. Show all posts

Friday, 25 December 2015

Carrot cake with Cream Cheese Frosting


I never had the guts to try any other type of cakes other than basic chocolate. And now that I did, I’m wondering why on earth did I not try this before. Must Must try for all dessert lovers. If you have never tried it before, then go for this; a totally different world of flavours awaits you.

Note:

I don’t use ginger powder for any recipes, so I dint bother to buy. I needed ½ tsp ginger powder for this recipe, so I did a bit of poking around and found out how to make ginger powder at home. I sliced the fresh ginger root super thin, and popped into a preheated oven for approximately 15 minutes till they had completely dried out. (Microwave works fine too). Then they went into my grinder and brmm brmmm (Just used 3-4 slices). Along with this I also popped my cinnamon sticks into the oven and ground them finely. If you have ready powders, good for you. And the nutmeg, just grate it with a grater.


This recipe serves 8 slices. Each serving provides 225 calories approximately.


For the Cake:


Here is what you’ll need:


1 cup all purpose flour (Maida)
1 ½ cup finely grated carrots
2 eggs
1 cup sugar (3/4 cup sugar if you don’t like it sweet)
¼ cup melted butter
¼ cup oil
½ cup nuts (almonds/ walnuts/pecans)
½ tsp baking soda
1 tsp baking powder
½ tsp salt
½ tsp ginger powder
½ tsp cinnamon powder
¼ tsp nutmeg powder
1 tsp vanilla essence

Method:

  1.  Preheat oven to 180°C
  2. Grease a 10 inch baking pan and dust it with flour.
  3. Wash, peel and grate the carrots finely.
  4. Chop the nuts roughly and roast it on low heat till light golden and aromatic. In 1 tbsp of all purpose flour toss the roasted nuts and keep it aside.
  5. In a separate bowl, sift the flour, baking powder, baking soda, salt, cinnamon powder, ginger powder and nutmeg powder. Keep it aside.
  6. In a large whipping bowl, beat the eggs till frothy for few minutes, and add the sugar. The egg sugar mixture should froth well and thicken.
  7. Add the oil, butter and vanilla extract and keep whisking.
  8.  Slowly add the flour mixture into the whisking bowl and gently fold in till completely mixed. Do not over beat.
  9. Gently fold in the grated carrots and nuts.
  10. Pour the batter into the greased pan and pop it into the oven for 30 minutes or till the toothpick comes out clean.
  11.  Let the cake completely cool before frosting.

For the cream cheese frosting:


Here is what you’ll need:


1 cup cream cheese
1 cup powdered sugar
½ tsp vanilla essence
2 cup whipped cream

Method:


  1. Whip up cream as per packet instructions and keep it aside.
  2. In a large bowl, whisk the cream cheese till softened and add the powdered sugar and vanilla essence.
  3. Gently fold in the whipped cream into the cream cheese mixture and your frosting is ready to go.
Frost your cake the way you want and Enjoy!


Recipe by Zohra Sada

Wednesday, 16 December 2015

Ras Malai - Yummy Creamyy Indian Sweet


Spongy soft balls cooked and served in thick sweet milk garnished with nuts and cardamom flavour is the king of Indian desserts in terms of richness.

This is a no fail recipe. I've been making ras malai since my teenage years and I've never gone wrong with this one and never have I bothered to try any other way.

This recipe makes 18-20 pieces of ras malai and each piece provides 140 Calories approximately.

Here is what you’ll need:


1 cup full fat milk powder
1 tsp all purpose flour
¾ tsp baking powder
1 tsp ghee
1 egg
4 cups full fat milk
1 ¼ cup sugar
2 cardamom
Almonds/pistachios for garnish

Method:

  1. Mix the full fat milk powder with all purpose flour (maida) and baking powder. 
  2. Crack in an egg and start mixing.
  3. Once the mixture starts binding together, add the ghee and if required another 2 tbsp milk powder.
  4. Knead to a soft dough.
  5. Pinch off small balls and start rolling into a ball. This should make 18-20 balls. Divide accordingly.
  6. In a large pot, bring 4 cups of milk to a boil with the sugar and cardamom.
  7. Once the milk comes to a rolling boil, lower the heat and start adding the rolled out balls into the milk.
  8. Close the lid and let the milk simmer for 7-8 minutes on a very low heat.
  9. After 7 minutes, open and check one piece if it’s cooked through the centre.
  10. If not, simmer for another 2 minutes and then switch off the flame.
  11. Serve cooled garnished with nuts.

Few things to remember:


  • Use FULL FAT milk powder. I always used Nido milk, though full fat Anchor would work well too. 
  • If your eggs are large you may need to use a couple more tbsp of milk powder while kneading.
  • The rolled out balls should have a smooth exterior. This is a proof that your dough is soft and good to go ahead.
  • Let the milk come to a rolling boil before adding the balls and then keep the flame on low while adding the balls. If the milk is boiling while adding the balls, it will cook immediately from outside and remain uncooked inside or it may all fall apart.
  • Try using a wide mouth vessel for boiling the milk as the balls will expand double its size.
'
Recipe by Zohra Sada

Monday, 7 December 2015

Prawns Stir Fry


Quick. Simple. Easy. Keep your ingredients all ready and turn on the heat.

This recipe serves 3 people and provides approximately 120 calories per serving.

Here’s what you’ll need:


15-20 medium sized prawns
½ cup carrot julienned
¼ cup capsicum sliced
1 spring onion with leaves chopped
1 tbsp garlic finely chopped
1 tbsp ginger finely chopped
2 tbsp butter/oil
½ tsp black pepper
1 tsp soy sauce
1 tsp red chilli sauce
Salt as per taste

Method:

  1. Heat up the wok and melt the butter.
  2. Fry the chopped ginger and garlic on high heat till light golden.
  3. Add the chopped spring onions and fry till softened.
  4. Add the cleaned deveined prawns and toss till cooked.
  5. Season the prawns with soy sauce, red chilli sauce, salt and pepper.
  6. Toss in the carrot and capsicum.
  7. Garnish with spring onion leaves.
  8. Serve with noodles or rice


Recipe by Zohra Sada

Saturday, 28 November 2015

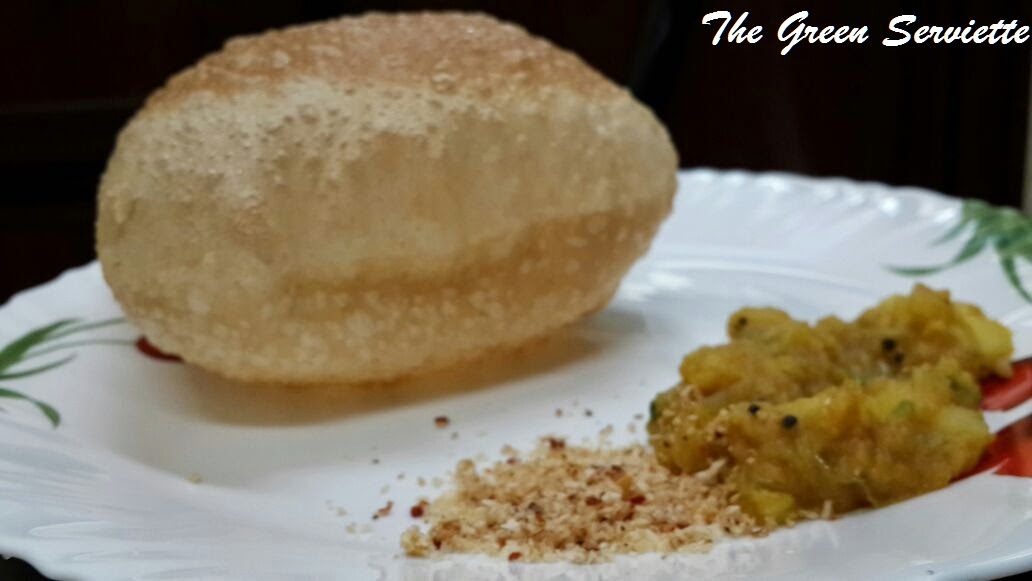
Garma garam Poori/Puri


And there are times, however healthy you try to eat, you want a heavy greasy breakfast. It may feel absolutely sinful but a couple kilometers run will help you get over that feeling. Poori accompanied with any curry of your choice. Bhaji, kala chana, chole vegetable korma or even halwa; best weekend breakfast. Easy, simple and straightforward.

This recipe serves 2 people and makes 6 pooris. Each puri gives approximately 107 calories.

Here is what you’ll need:


1 cup whole wheat flour
1 tsp oil
½ tsp salt
Water as required
Oil for deep frying

Method:

  1. Sieve the flour and add salt and oil to it.
  2. Mix together and slowly start adding lukewarm water forming stiff dough.
  3. Knead well for 5 minutes and rest the dough covered for 20 minutes.
  4. Make small portions out of the dough and roll it out into 4 inch diameter.
  5. Heat the oil and test with a small portion of dough if the oil is well heated.
  6. The dough should bubble and rise, Once the oil is heated, fry each puri at a time.
  7. Slowly lower the rolled out puri into the oil and immediately splashing oil on top and pressing gently with the back of a spoon.
  8. Once the poori puffs up, turn the other side.
  9. Once it turns golden brown both ways, remove it out on a kitchen towel to absorb excess oil.
  10. Serve hot or keep it in a casserole.


NOTE:

  • While kneading, make sure the dough is stiff unlike regular chapatti.
  • While rolling do not use more flour to dust it. A good dough does need flour for dusting. If required use little oil to help roll.
  • Fry, only when the oil is well heated. The heat should be medium high.

 Also try Potato Masala in The Kitchen Counter column.

Recipe by Zohra Sada

Thursday, 19 November 2015

Coconut Masala filling/topping for Puttu


 This masala of coconut and chicken is a match made in heaven for puttu. It works perfectly well as a filling for other recipes calling for a coconut filling like chapathi foldovers too. 


Here is what you’ll need:


2 chicken breast pieces
2 large onions
1 ½ cup fresh coconut shredded 
6-7 green chillies
10 curry leaves
1 tbsp ginger garlic paste
1 tsp black pepper
2 tbsp oil
½ tsp turmeric powder
1 tsp curry powder
1 tsp coriander powder
1 tsp cumin powder
½ tsp garam masala
½ cup chopped coriander
½ cube stock (optional)
Salt

Method:

  1. Sauté the onions, chilli and curry leaves on low flame till the onions reduce. Sprinkle salt.
  2. Add the ginger garlic paste and fry on medium heat till the raw smell goes. Fry in the turmeric powder.
  3. Add the rest of the masala powders  and then add in the chicken.
  4. Let the chicken cook in its own juice. If the masala sticks to the bottom, add a couple of tbsp water.
  5. Once the chicken is completely cooked, remove it from the masala and shred it finely.
  6. Put back the shredded chicken in the masala and mix well.
  7. Mix in the coconut and chopped coriander and cook on low simmer for 10 minutes till steamed.
  8. Use the filling for your favorite recipe.

 Recipe by Zohra Sada

Tuesday, 10 November 2015

Puttu - Rice powder and coconut delicacy

Making of the puttu podi:


Puttu: Steamed cylinders of finely powdered rice and coconut layers. A favorite breakfast in the Kerala cuisine. Most of the recipes for puttu ask for buying ready made rice flour or puttu podi meant for making puttu. I have often heard friends complaining that puttu made of ready puttu podi turns out very stiff and hard. We like our puttu crumbly and soft. So here is the puttu recipe from scratch.

I have used a mixture of brown or Kerala Parboiled rice along with just normal parboiled rice. The brown parboiled rice tends to make the puttu even softer. Wash and soak the rice for 3 hours atleast. Once soaked, drain the rice and spread it out on a cotton cloth to dry the rice for 10 - 15 minutes.


Dried rice is easier to grind and does not clump together.  Once dried, use a heavy duty grinder to finely powder the rice. Remember, the powder should be extremely smooth. It may take 5 minutes of grinder time. Do not powder all the rice at once. Make it into 2-3 batches. Your rice powder for the puttu is ready. This puttu powder can be done in bulk and stored in freezer for a couple of months.

Once ready to assemble the puttu, take rice powder in a deep dish, add a tsp of salt and 2-3 tsp of sugar. Add 2 tbsp of water and mix well. The water is added bare minimum to help the puttu cook with steam. If the mixture becomes wet or if the coconut filling is moist and you are using a puttu maker, you are inviting disaster. The pressure builds up and the whole cylinder of puttu will jump out with a blast. Literally. Been there done that. Be careful.


The layering of puttu can be done with plain coconut or spicy coconut masala with shredded chicken. Check out the recipe of Coconut Masala. Plain shredded coconut can also be used as a topping and a side dish of chicken/ sambhar can be served.

For assembling in a puttu maker, start at the bottom with a layer of plain shredded coconut. The second layer will be the rice powder. The third layer will be either the coconut masala or plain coconut. This will go on repeating till the last layer will be a coconut/masala layer. You can now steam your puttu. The doneness of your puttu is when your puttu maker steams.

If you want to make puttus and you don’t have a puttu maker, use your steamer and idli vaatis/bowl. Each individual bowl will be a puttu. The base layer will coconut filling and top it with rice powder. Pop these into your steamer and steam for 5 minutes.

If you like your puttus sweet make plain puttus with plain coconut topping and whilst serving add a tsp of ghee and sugar.

This recipe will serve 4 people. Each serving (3 puttus) of puttus give 414 calories approximately.

Here is what you’ll need:


¾ cup Kerala parboiled rice
¼ cup parboiled rice
1 tsp salt
2 tsp sugar
2 tbsp water

Method:

  1. Wash and soak the rice for 3 hours
  2. Drain the rice and spread it out on a cloth and dry for 10- 15minutes
  3. Grind the rice into a fine powder
  4. Add salt sugar and water
  5. Assemble the coconut filling and rice powder in a puttu maker and steam
Recipe by Zohra Sada

Sunday, 1 November 2015

Sweet Momos / Hatha Welli Nawari


Only for ease of understanding I have named them as sweet momos. Though the recipe is very similar to that of momos, this is a traditional bhatkali recipe going by the name of “hatha welli nawari”. 

The method of preparation is similar to that of momos. But here the filling is sweet with a coconut base. I have used jaggery as a sweetener. Sugar works extremely well too.


The skin for the momo is made of semi cooked dough. Once the water comes to a rolling boil, switch off the flame.  Add the salt and ghee and dump in all the dough at once and then go ahead and knead to medium soft dough.  Once the dough is ready, pick out small pieces and roll out into chapathi.


On one half side of the chapathi spread a thin layer of the filling .Now fold the chapathi and seal the edges.


The momos are ready to get steamed.

This recipe makes around 20 momos.
Each serving (1 momo) gives approximately 92 calories.

Here is what you’ll need:

For the filling:

1 cup fresh coconut
1- 1 ½  cups jaggery/sugar
1 tbsp rose water
¼ cup almonds and cashew nut chopped
1 tsp sesame seeds (til)

For the dough:

1 cup water
1 ¼ cup all purpose flour (maida)
1 tsp ghee
½ tsp salt

Method:

  1. For the filling mix the coconut, jaggery and nuts in a heavy bottom pan and let it cook on low flame till the coconut cooks, jaggery melts and the mixture steams. Add a tbsp of rose water.
  2. For the dough, in a large pot bring the water to a boil.
  3. Add salt and ghee to the water.
  4. Once the water comes to a rolling boil, dump in all the flour at once and start mixing it with a wooden spatula.
  5. Once the dough starts clumping together, lay it out on a flat surface and knead it well till it forms soft dough.
  6. Pick out tiny lemon sized balls of dough, knead each of them and roll out skin thin chapathi.
  7. Add the prepared filling to one half and seal shut by pressing the edges together.
  8. Keep the prepared momos on a  paper.
  9. Bring the steamer to a boil. Grease the steamer plate with few drops of oil to avoid the  momos sticking.
  10. Once the water boils, arrange the momos on the steamer plate. Take care that each piece don’t touch the other.
  11. Steam for 10-12 mins.
  12. Serve cool. 


Recipe by Zohra Sada

Sunday, 25 October 2015

Mutton Haleem


Here is what happened. A cold chilling day, and a craving for a dish of hot spicy haleem. I soak the burgul and dals. Defrost the meat and Lo! Behold! the box of haleem masala is almost empty. (I normally buy ready made masala pack, never had the guts to try making from scratch.) So I go like, lets try.  I scan the list of ingredients mentioned on the box, estimate the amount minus all the preservatives and chemicals and tada! The ready dish of haleem turns out to be better than all my previous ready masala haleem.

For making haleem I use broken wheat /burgul. It soaks in no time and cooks faster than whole grains. 


Use the dal mixture of your preference or whatever is available in your pantry.  All these beautiful dals serve as powerhouse of proteins.


Dry roast all the spice mixture till fragrant and powder them in a grinder.


For those of you who like chicken just substitute the meat.

This recipe serves 8 people.  
Each serving of haleem gives approximately 385 calories and 25g of proteins.

Here is what you’ll need:


½ kg mutton
1 cup broken wheat (burgul)
¼ cup red dal
¼ toor dal
¼ cup urad dal (mash dal)
¼ cup any dal of your choice (optional) (channa dal)
1 tsp ginger paste
1 tsp garlic paste
3-4 tbsp oil/ghee
4 tbsp chopped Coriander
½ tsp turmeric powder
½ tsp red chilli powder
½ cube maggie stock (optional)
Fried onions (for garnish)
Lemon (for garnish)

Whole Spices:
1 tsp whole cumin (jeera)
1 tsp whole coriander (dhaniya)
½ tsp whole black pepper
4 cardamoms (elaichi)
1 cinnamon stick (dalchini)
1 bay leaf (tej patta)
4 cloves (lavang)
10 curry leaves 
1 tsp onion seeds/ kalonji/ nigella seeds

Method:

  1. Wash and soak the dal and broken wheat in lukewarm water for 1 hour.
  2. Dry roast all the whole spices on low flame till fragrant. Once cooled, grind it into a fine powder.
  3. In a pressure cooker, heat ghee/oil and fry the ginger garlic paste till the raw smell goes. Add turmeric powder and red chilli powder.
  4. Add the cleaned mutton and the powdered spices.To this add 4 cups of water and pressure cook on low flame for 20-30 minutes till all the meat falls off the bones.
  5. Separate the meat and bones and shred the meat finely.
  6. In a pressure cooker, cook the burgul and dals with 10 cups of water for 20 minutes.
  7. Once cooked, add the mutton pieces and soup of the mutton to the dal base.
  8. Adjust salt and add  stock (optional). Add the chopped coriander.
  9. Let the haleem cook till desired consistency.
  10. Garnish with fried onions and coriander leaves. Squeeze in a slice of lemon.

Learn to make perfect fried onions/Birista in the The Kitchen Counter.

Recipe by Zohra Sada

Friday, 16 October 2015

Pav Bhaji


A popular Indian fast food originated in the Maharashtrian cuisine, the pav bhaji is the most widely sold food on Mumbai’s street. Everybody’s favorite lunch, snack or dinner, the word bhaji means vegetables and pav means bread roll. The pav bhaji is a spicy tangy mixture of vegetables largely of potatoes, generous amount of tomatoes, topped with butter. It’s served hot with warm soft rolls of bread or pav toasted in butter.


The recipe for pav bhaji may vary largely but the basic ingredients and general method of cooking remain the same. Potato is the base vegetable and to that cauliflower, carrots, peas or even beets can be added. Sometimes cooked and mashed toor or masoor dal is also added to maintain consistency. Capsicum is another essential ingredient that is added which gives a distinct flavour.

This recipe serves 4 people providing approximately 200 calorie per serving of the bhaji.

Here is what you’ll need:

2 large potatoes
1 cup of vegetable (carrot/cauliflower/peas)
2 tbsp butter
¼ cup capsicum
2 large tomatoes
1tbsp tomato paste (optional)
1 tbsp ginger garlic paste
3-4 green chillies chopped
 6 pav for serving with the bhaji

Garnish:
1 onion finely chopped
2 tbsp coriander
Butter
Lime wedge

Pav bhaji masala powder:
¼ tsp turmeric
1 tsp red chilli powder
1 tsp coriander powder
1 tsp cumin powder
½ tsp garam masala
1 tsp chat masala

Method:

  1. In a pressure cooker, cook the potatoes and optional vegetables till soft.
  2. In a flat bottom pan, melt the butter. Add the ginger garlic paste and chillies till the raw smell goes.
  3. Chop the tomatoes finely and fry it in the butter till the tomatoes soften and became mushy. Add salt to hasten the process.
  4. Add finely chopped capsicum to the tomatoes and sauté for a few more minutes.
  5. To this sprinkle all the masala powders, be careful not to burn.
  6.  Immediately add all the cooked vegetables and required amount of water.
  7. Mash the vegetables till they lose their shape and form a thick gravy like paste.
  8. Cook further till the bhaji reduces to the desired consistency.
  9. Garnish with chopped onions, coriander, fresh butter and a wedge of lime.
  10. Serve hot with warmed pav.
Recipe by Zohra Sada

Wednesday, 7 October 2015

Groundnut Jaggery Chikki


Chikki or peanut brittle is a power packed nut bar made with jaggery and peanuts. There are several different varieties of chikki in addition to the most common groundnut chikki. Each chikki is named depending upon the ingredients used. Chikki can also be made with sugar. It’s a healthy snack option and a powerhouse of iron and omega fats. Apart from making the chikki bar, chikki ladoos can also be made with this same recipe.

Ingredients:

500 gm skinless peanuts/groundnuts (Split)
300 gm jaggery, cut into small pieces
4 tbsps ghee/ clarified butter 

Method:

  1. Heat a pan on a medium flame, and gently roast (stirring frequently) the peanuts. Remove from heat and cool.
  2.  Grease a large, flat plate with some ghee and keep aside.
  3. Put a deep, heavy-bottomed pan on the fire (medium heat) and add the jaggery and ghee to it. Allow to melt and cook (stirring almost continuously) till it turns dark brown. Test for doneness now and often till ready. You will know it is ready when a drop of it put onto a clean surface, cools to harden to a brittle consistency.
  4. Turn off the heat and add the roasted peanuts. Fold in so the peanuts are fully coated. Immediately pour this mixture onto the previously greased plate and smooth with the back of the spoon to form a flat, 1/2" thick layer. Allow to cool then break into bite-sized pieces.
  5. To make chikki ladoos, wait till the mixture is warm enough to take in hand and shape into small balls.
  6. Chikki can be stored for a couple of days in an airtight container, in a cool, dry place.

Note: Sometimes the chikki may turn out to be extra sticky and hard on the teeth, to avoid this you can add a little amount of water while melting the jaggery.

Recipe Faiz Lahori

Monday, 28 September 2015

Aloo Paratha - The two authentic methods!


OK! Have it your way. If you have already checked the Easy Aloo Paratha recipe and you still want to do it the “authentic” way. Here you go.

Prepare the potatoes first. If you like to keep it simple, good with me. Just add salt, red chilli powder, cumin powder and some chat powder. If not, let’s spice it up some more.

The first method of making the aloo paratha is where you divide one portion of the dough into two. Roll each of them separately into 4-5” diameter. Spread generous amount of aloo mixture on one side and cover it with the other. Pinch down the sides firmly till completely sealed. Now start rolling, by initially gently patting down with the hand. Then go ahead and use a rolling pin to roll out the parathas larger. 


The second method of rolling the paratha is taking a single portion from the dough and flattening it with your hand. Roll it out to about 5” diameter. Place the aloo mixture the size of the dough into the flattened dough. Pick up the edge and start pleating the dough brining all the edges to the centre. Tug the edges gently and keep flattening the edges if required. Once the dough is completely sealed sprinkle some dry flour and start rolling the paratha by gently pressing with your fingers. Once it flattens to a 5 inch diameter again then use the rolling pin to flatten it out completely. 


This recipe makes 6 parathas and one paratha provides approximately 205 Calories.

Here is what you’ll need :


2  medium potatoes
1 onion finely chopped
1 tbsp oil
5-6 curry leaves
1 tsp ginger garlic paste
3 chillies finely chopped            
½  tsp coriander powder
½  tsp cumin powder
1 tsp chaat masala
½ tsp red chilli powder
Salt
 1 tbsp oil
2 cups Whole wheat flour
½ tsp sugar
Butter/oil/ghee to fry

Method:

  1. Pressure cook the potatoes till soft and grate them.
  2. In a kadai, heat 1 tbsp oil and fry the ginger galic, curry leaves and chopped green chilli.
  3. Add the onions and sauté till softened.
  4. Sprinkle in coriander, cumin, chaat, red chilli powder and salt.
  5. Mix in the grated potatoes and coriander and switch off the flame.
  6. Let the potato masala completely cool down and keep it in the fridge for 2 hours.
  7. To prepare the dough, mix the whole wheat flour with salt, sugar and oil and knead with lukewarm warm to form soft pliable dough.
  8. Rest the dough for 20 minute.
  9. Follow the method shown above to roll the paratha.
  10. Fry the paratha on heated tawa using butter/ghee/oil.


NOTES:
  • For easy rolling of the parathas without the potato mixture spilling out, remember to keep the potato mixture very dry.
  • During the pressure cooking of potatoes it’s not essential to immerse the potatoes in water. Just wash the potatoes. Do not peel. Keep the potatoes in a smaller vessel which could go inside the cooker. Fill the cooker with water and not the vessel containing the potatoes. This method of pressure cooking could take a bit of extra time.
  • Alternatively, if you did cook the potatoes by boiling directly in water, then once the potatoes mixture is completely ready, refrigerate for 2 hours in an open plate. This dries up the mixture further.
  • The second thing to remember is to keep the dough soft. Only if your dough is pliable will you be able to stretch the dough and fill it with potato mix. Or else it will break while rolling and the filling will spill out. 

        Check out the recipe of Easy Aloo Paratha in The Kitchen Counter column.

Recipe by Zohra Sada

Saturday, 19 September 2015

Mutton Curry Kerala Style


I love pathiris. The soft rotis made of rice flour is a famous Kerala recipe. But what accompanies the pathiri should be an authentic Kerala style chicken or mutton. The menu of pathiri and kerala style mutton curry is an occasional treat in my house.

For those of you who have never tried this aromatic fragrant curry must try this recipe.

The thing that makes a Malabar or Kerala Curry stand out is the extra hot spiciness and use of whole garam masalas.

For this recipe, I have roasted all the whole spices and the fresh coconut. I have then ground it into a fine powder and added to the bhuna masala.


The people of Kerala love their curry spicy hot!! If you are like me and cant tolerate extreme spiciness then, this recipe is for you. Its much milder.


Here is what you’ll need:


6-7 pieces of mutton in bones
½ cup fresh coconut
1 tsp coriander whole
1 tsp jeera whole
5 whole black pepper seeds
3 red chillies
1 bay leaf
1  inch cinnamon stick
¼ tsp fenugreek
1 medium onion
1 tomato
1inch ginger
5 cloves garlic
2 green chillies
6-7 curry leaves
½ tsp mustard
Salt as per taste
2 tbsp oil

This recipe serves 3 people and each serving provides approximately 350 calories.

Method:

  1. In a small pan, heat one tsp oil. Add the whole coriander, whole jeera, fenugreek, whole black pepper, cinnamon stick, bay leaves, red chilli and coconut.
  2. Once the coconut starts turning brown, switch off the flame and let the mixture cool.
  3. Grind the mixture into a fine paste with little water.
  4. In a pressure cooker, heat 1 tbsp oil and splutter the mustard seeds.
  5. Once the mustard splutters, add the curry leaves, green chillies and onions.
  6. Once the onion brown, add the tomato. Cook till the tomatoes go soft.
  7. Add the cleaned mutton to the onion tomato mixture, and cook till mutton sweats.
  8. Add a cup of water and pressure cook for 4 whistles on medium low heat.
  9. Once the mutton is cooked, add the ground paste of coconut and spices and mix well.
  10. Add salt to adjust the taste.
  11. Serve hot with pathiris.
Recipe by Zohra Sada

Thursday, 10 September 2015

Dill Leaves Caramel Pudding/ Shawfapana pudding


Haha! I googled for the above recipe and nothing came up. So let me show you how to make it. Tastes better than plain vanilla caramel pudding! The only place where I use dill leaves is in this pudding.

The recipe for a normal vanilla caramel pudding is exactly the same just minus the dill leaves. Dill leaves works as a substitute for vanilla essence. It gives a different flavour. Nevertheless I add both vanilla essence and dill leaves. You can never be too sure around eggs and its smell. :-)

In the picture I have shown where I have strained the dill leaves using a fine muslin cloth which gives a lighter shade of green. If you wish, you could strain it using a strainer, which will give tiny pieces of leaves in the pudding which is also cool. I do it both the ways. The leaves will not bother you.

I use two 10” pans to steam the pudding. I know some people like their puddings to stand tall. I don’t. Also this works as a portion control method. You could use a deep 10” inch pan to steam the pudding or use ramekins. It’s up to you.

So about preparing the caramel, if you’re using a stainless steel pan that goes right into the steamer, then prepare a thicker caramel using less water. But if you want to use ramekins or transfer the caramel into another pan, then you might need to use more water.

This recipe serves 8-10 people providing approximately 135 calories per serving.


Here is what you’ll need:


For the caramel:
4 tbsp sugar (divided)
2 tbsp water

For the pudding:
1 cup tightly packed dill leaves
6 eggs
2 cups milk
1 cup sugar
1 tsp vanilla essence

Method:

  1. Separate the leaves from the stem of the dill leaves. Wash thoroughly.
  2. In a blender, crack the eggs, pour the milk and sugar along with vanilla essence. Add the dill leaves and blend it all together.
  3. Strain the mix in a muslin cloth or fine strainer.
  4. Heat up the pan for preparing the caramel.
  5. Keep the heat on medium low and sprinkle the sugar on the pan along with water.
  6. If making 2 pans of pudding divide the sugar as 2 tbsp for each pan.
  7. Let the sugar start boiling and change its colour to deep dark golden.
  8. Switch off the heat; pour half the pudding mix into the pan.
  9. Place the pan into a boiling steamer and steam the pudding for 20 minute.

Recipe by Zohra Sada